I loved my 70s dress and used to get lots of compliments every time I wore it, but it had been sittingin in my wardrobe unworn for the past 3 years, so I decided it was time to give it a re-fashioning and turn it into a more flattering, waist hugging, cleavege showing 1940s tea dress! So here is a little guide to how I did it so that you can try your hand at a different
dressmaking project too!
 |
| Step 1 |
STEP 1. Unpick the collar and using some fashion tape or tailor chalk draw a v-neck shape making sure you mark the centre line as a reference. Mark 2cm seam allowance (left img) above the v-neckine line.
 |
| Step 2 |
STEP 2. Cut along the neckline marking starting by making a slit on the shoulder line and continue all the way down both sides of the neckline. Remove the button plackets.
 |
| Steps 3&4 |
STEPS 3 & 4. Measure approx. 4cm from the edge of the original back neck opening and mark the new neckline making sure it meets the front neckline at a nicely shaped angle (right pic.) Proceed to pinning the front of the bodice and stitch leaving 1cm seam allowance.
 |
| Steps 5&6 |
STEPS 5 &6. Cut along the new back neckline opening (left pic). Fold the edge of the neckline by approx. 7mm and stich close to the folded edge (right pic) Press the new seam flat and fold over itself topstitching on the right side of the neckline.
 |
| Steps 6&7 |
STEPS 6&7. Mark the new waistband shape at the front and back of the bodice, making the centre front aprrox. 4-5cms higher than the side front, and the centre back just 1cm higher than the sides. Cut out the top bodice and start marking dart lines putting one dart on each side of the front and back centre lines deciding on the distance you would like them to be from your centre lines. In my case darts were necessary to obtain a fitted waistline as the original dress did not have any bodice shaping. Proceed to forming approx 1cm wide darts (or whatever measurement fits you better). Press the darts towards the sides.
STEP 8&9. Once you have your waistband nicely shaped proceed to stitch a gathering line approx 3-4mm from the bottom edge of the top section of the bodice and gather so that it fits the waistband. Attach the upper bodice to the wistband stitching only just above the gathering line. Press the seam.
 |
| Steps 10&11 |
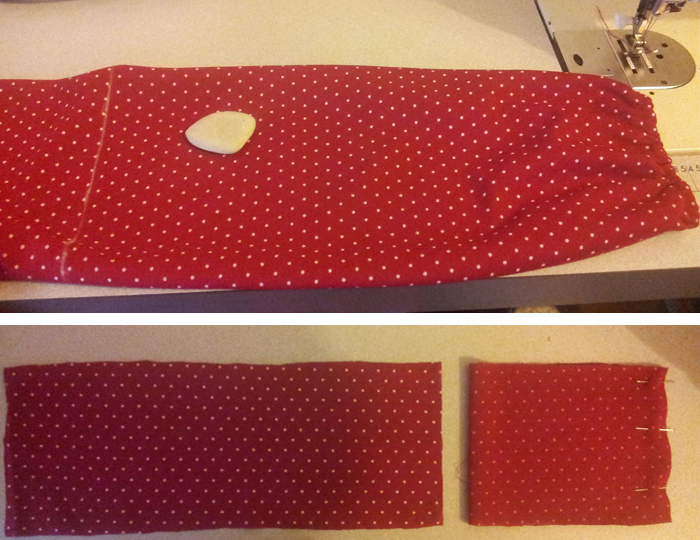
STEPS 10&11. Decide the length of your sleeve (without the cuffs) and mark a straight cutting line measuring from the the wrist line up to your desired length. Cut off the lower section of the original sleeve and use this to cut out the sleeve cuffs. Decide how deep you'd like these to be and double that measurement adding an extra 2cms seam allowance. Mark your cuffs and cut them out unpicking the side seams of the original sleeve to obtain a single layer strip. Measure around your arm were your newly cut sleeve ends to determine the width of the cuffs. Transfer the measurements onto your cuffs and cut out to the desired length (remember to add 2cms seam allowance on the sides too) You can now proceed to folding your cuffs in half legthwise (with right sides of fabric together), pin them and stitch 1cm from the edge.
 |
| Steps12&13 |
STEPS 12&13. Cut off about 5mm off cuffs' seam allowance. and press the seam. Stitch a gathering line about 5mm from the edge of the sleeve and gather to the same measurement as the cuffs.
 |
| Steps 14&15 |
STEPS 14&15. With the cuffs inside out, put them over the sleeves making sure these are on the right side and the edge of the sleeves matches those of the cuffs. Pin and stitch 1cm from the edge. Press the seams downwards. Fold the cuffs over and press. Turn the top edge of the folded cuff in by about 5mm and hand stitch around the sleeve edge just above the stitch line between the sleeve and the cuff and voilà... your 1970s to 1940s frock
dressmaking project is now complete!
http://www.sewitwithlove.com/,
https://www.facebook.com/sewitwithlove,
https://twitter.com/SewitWithLove